はじめに
AWS ElastiCacheのredisにセッションを格納することでステートレスな構成にすることが資格等で教科書的に紹介されることが多い印象です。実際Spring Bootでredisを使用する方法も多数紹介されています。
ただし、Spring Bootからクラスタ構成のredisへの接続に関する情報が少なかったのでサンプル(github)を作成しました。
※インフラはサンプルに含まれません。セキュリティグループ等 ネットワーク経路の確保にご注意ください。
ポイント
pom.xml
spring-session-data-redisとlettuce-coreを追加します。
サンプルではそれぞれ2.6.3と6.1.8.RELEASEを指定してます。
|
1 2 3 4 5 6 7 8 9 10 |
<dependency> <groupId>org.springframework.session</groupId> <artifactId>spring-session-data-redis</artifactId> <version>2.6.3</version> </dependency> <dependency> <groupId>io.lettuce</groupId> <artifactId>lettuce-core</artifactId> <version>6.1.8.RELEASE</version> </dependency> |
application.yml
Redis Clusterに関する情報を追加します。
|
1 2 3 4 5 6 7 8 9 10 11 12 13 14 15 |
spring: session: store-type: redis redis: configure-action: none # ConfigureRedisAction.NO_OP redis: host: test-cluster.xxxxxx.clustercfg.apne1.cache.amazonaws.com port: 6379 cluster: nodes: test-cluster-0001-001.xxxxxx.0001.apne1.cache.amazonaws.com:6379,test-cluster-0001-002.xxxxxx.0001.apne1.cache.amazonaws.com:6379,test-cluster-0002-001.xxxxxx.0001.apne1.cache.amazonaws.com:6379,test-cluster-0002-002.xxxxxx.0001.apne1.cache.amazonaws.com:6379 ssl: false # If ElastiCache configuration "in-transit encryption" is enabled, this is true data: redis: repositories: enabled: false |
spring.session
spring.session.store-typeにはredisを指定し、redisでのセッション管理にします。
spring.session.redis.configure-actionはnoneに設定します。ElastiCacheでconfigコマンドが禁止されていることへの対応でConfigureRedisAction.NO_OPと同意です。
参考:
【第20回】NoSQL(10)-Spring SessionとSpring Data Redisを用いたアプリケーション(1)
Spring Session Data RedisがどうやってRedis Keyspace Notificationsを有効にしているのかコードを読んでみた
spring.redis.host
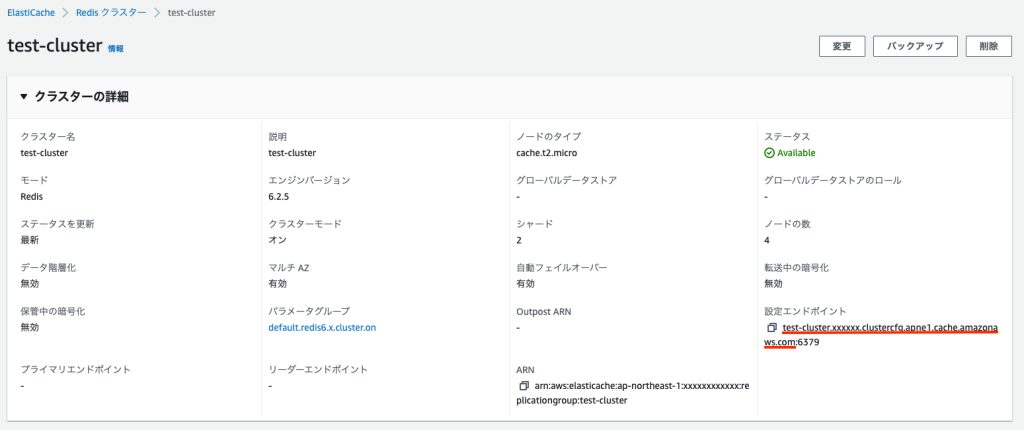
spring.redis.hostにはAWSコンソール上に表示されている設定エンドポイントを入力します。
ポート番号は含めずにspring.redis.portへ記載してください

spring.redis.cluster.nodes
spring.redis.cluster.nodesにはAWSコンソール上に表示されているシャードとノードに表示される各ノードのエンドポイントを ,区切り でポート番号も含めて記載します。

spring.redis.ssl
spring.redis.sslにはsslを使用するかを指定します。「転送中の暗号化(in-transit encryption)」を有効化している場合はtrueを指定します。サンプルでは暗号化していないためfalseを指定してます。
spring.data.redis.repositories.enabled
repositoryとしては使用しないため、不具合防止のためにfalseを指定しておきます。
動作確認
サンプルの確認用エンドポイント
サンプルでは動作確認用にredisへ保存するエンドポイントと取得するエンドポイントを実装したコントローラを用意してます。
|
1 2 3 4 5 6 7 8 9 10 11 12 13 |
@GetMapping("/set-session/{value}") @ResponseBody public String setValueToRedis(@PathVariable("value") String value) { httpSession.setAttribute(SESSION_KEY, value); return "OK"; } @GetMapping("/get-session") @ResponseBody public String getValueFromRedis() { String value = (String) httpSession.getAttribute(SESSION_KEY); return value == null ? "none" : value; } |
/set-session/save-valueで「save-value」をredisに保存します。


redisのデータ確認
redis-cliに接続できる環境を構築します。(環境構築はAWS公式手順が参考になります。)
環境構築後、前項の設定エンドポイントを指定して接続します。
※「転送中の暗号化(in-transit encryption)」を有効化している場合は「–tls」も必要です。
|
1 |
redis-cli -h test-cluster.xxxxxx.clustercfg.apne1.cache.amazonaws.com -c -p 6379 |
Keys *コマンドを発行し、データを確認します。
|
1 2 3 |
[test-cluster.xxxxxx.clustercfg.apne1.cache.amazonaws.com:6379> Keys * 1) "spring:session:expirations:1651918080000" 2) "spring:session:sessions:586b9ed6-5b09-4f7f-bcb9-351051ed5a48" |