内容
本番環境と開発環境では異なるDBを使用することが多いです。
本記事ではHerokuとローカル開発環境で使用するDBを分け、開発者が意識することなく切替えられるようにします。
Herokuではpostgresqlを使用しローカルではH2でpostgresqlを構成します。
環境変数を設定
Herokuの場合はHeroku CLIを使用して環境変数を設定します。
|
1 |
$ heroku config:set SPRING_PROFILE_ACTIVE="heroku" --app "[アプリ名]" |
HerokuのDBを設定
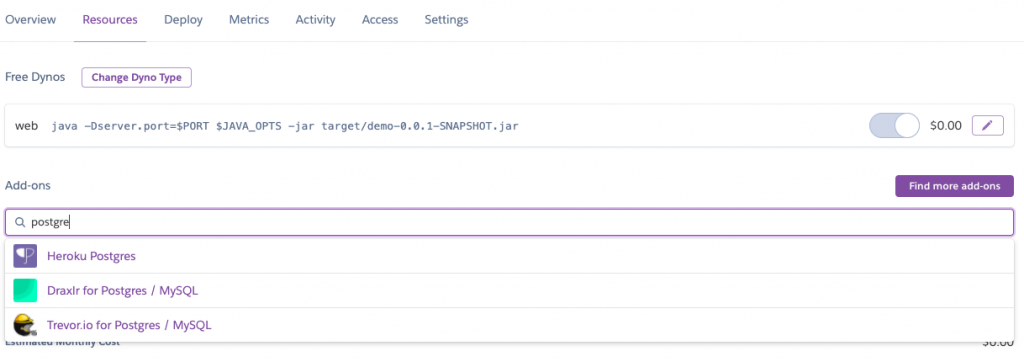
HerokuのwebコンソールからResourcesからHeroku Postgresを選択。
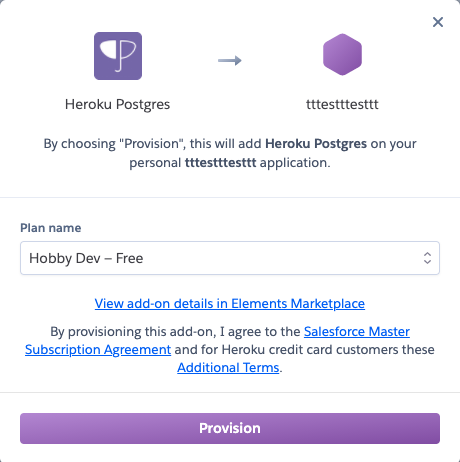
Hobby DEV -Freeを選択しProvision。
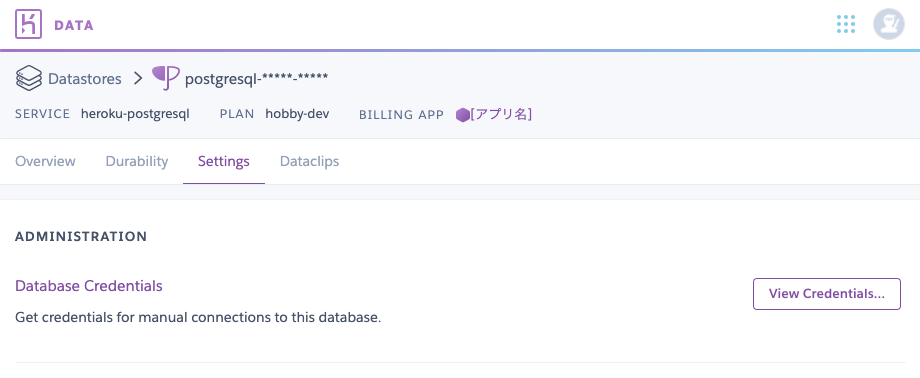
作成されたHeroku Postgresをクリックしてコンソールを開き、SettingsからView Credentialをクリック
Host, Database, User, Port, Passwordをメモ。
pom.xmlにH2とPostgresqlを追加します。
pom.xml
|
1 2 3 4 5 6 7 8 9 10 11 12 13 14 15 16 17 18 19 20 21 |
(略) <dependencies> (略) <dependency> <groupId>org.springframework.boot</groupId> <artifactId>spring-boot-starter-data-jpa</artifactId> </dependency> <dependency> <groupId>com.h2database</groupId> <artifactId>h2</artifactId> <scope>runtime</scope> </dependency> <dependency> <groupId>org.postgresql</groupId> <artifactId>postgresql</artifactId> <scope>runtime</scope> </dependency> </dependencies> (略) |
追加のapplication.propatiesとH2用のスキーマとデータを作成
|
1 2 3 4 5 6 7 8 9 |
src/main/resources/ ├── application-common.properties // 共通のプロパティ ├── application-heroku.properties // Heroku用のプロパティ ├── application-local.properties // ローカル用のプロパティ ├── application.properties ├── schema.sql // H2で起動時に作成されるスキーマ ├── data.sql // H2で起動時に投入されるデータ ├── static └── templates |
各ファイルを編集
application.propaties
|
1 |
spring.profiles.active=${SPRING_PROFILE_ACTIVE:local} |
application-local.properties
|
1 2 3 4 5 6 7 8 9 10 11 12 13 14 15 16 17 |
spring.profiles.include=common # テスト用のインメモリデータベース(h2) spring.datasource.url=jdbc:h2:mem:testdb;DB_CLOSE_DELAY=1;DB_CLOSE_ON_EXIT=FALSE;MODE=PostgreSQL spring.datasource.driver-class-name=org.h2.Driver spring.datasource.username=sa spring.datasource.password= spring.datasource.sql-script-encoding=UTF8 spring.h2.console.enabled=true spring.h2.console.path=/h2-console spring.h2.console.settings.web-allow-others=true spring.datasource.initialization-mode=ALWAYS spring.datasource.schema=classpath:schema.sql spring.datasource.data=classpath:data.sql # アプリで参照する変数 env=local |
application-heroku.properties
※HerokuのDB情報に置換してください。
|
1 2 3 4 5 6 7 8 9 10 11 |
spring.profiles.include=common # 本番用 spring.datasource.driver-class-name=org.postgresql.Driver spring.datasource.url=jdbc:postgresql://[Host]:[Port]/[Database] spring.datasource.username=[User] spring.datasource.password=[Password] spring.datasource.initialization-mode=NEVER # アプリで参照する変数 env=heroku |
※Herokuとローカルで共通の変数があれば、application-common.propertiesへ記載してください。
H2のテーブル定義をschema.sqlに追加。
※postgresqlの制約でテーブル名を「user」とすることはできません。H2では作成可能ですが、Herokuでエラーとなるので「usertbl」としてます。
例
|
1 2 3 4 5 6 |
CREATE TABLE usertbl ( id VARCHAR(100), password VARCHAR(100) NOT NULL, role VARCHAR(100) NOT NULL, PRIMARY KEY(id) ); |
data.sqlに初期データを追加。
※パスワードはbcryptを使用した場合の”password”です。
例
|
1 2 3 4 5 |
INSERT INTO usertbl (id, password, role) VALUES ('user1', '$2a$10$xRTXvpMWly0oGiu65WZlm.3YL95LGVV2ASFjDhe6WF4.Qji1huIPa', 'admin'), ('user2', '$2a$10$xRTXvpMWly0oGiu65WZlm.3YL95LGVV2ASFjDhe6WF4.Qji1huIPa', 'general'); |
Heroku Postgresのコンソールを開き、SettingsからView Credentialをクリックして表示されるHeroku CLIをターミナルにコピペしてHeroku Postgresqlに接続し、同じテーブルとテストデータを作成する。
|
1 |
$ heroku pg:psql [DB名] --app [アプリ名] |
|
1 2 3 4 5 6 7 8 9 10 11 |
CREATE TABLE usertbl ( id VARCHAR(100), password VARCHAR(100) NOT NULL, role VARCHAR(100) NOT NULL ); INSERT INTO usertbl (id, password, role) VALUES ('user1', '$2a$10$xRTXvpMWly0oGiu65WZlm.3YL95LGVV2ASFjDhe6WF4.Qji1huIPa', 'admin'), ('user2', '$2a$10$xRTXvpMWly0oGiu65WZlm.3YL95LGVV2ASFjDhe6WF4.Qji1huIPa', 'general'); |
posrgresqlのコマンド操作を終了。
|
1 2 |
# windowsは¥qかもしれません。 \q |
お疲れ様でした!